Description
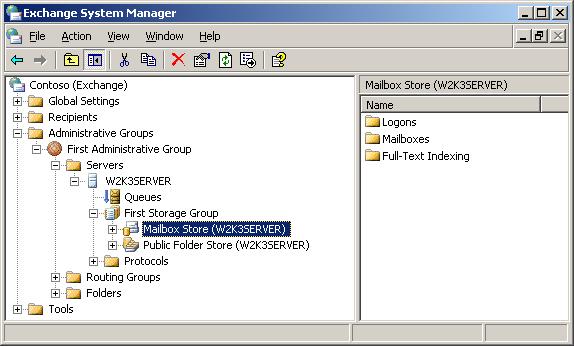
To grant an account access to all mailboxes on a mailbox store, the easiest way it to grant the "Receive as" and "Send as" permissions on the mailbox store. To do this, navigate to the mailbox store in the Exchange Systems manager:
 The mailbox store in the Exchange Systems Manager
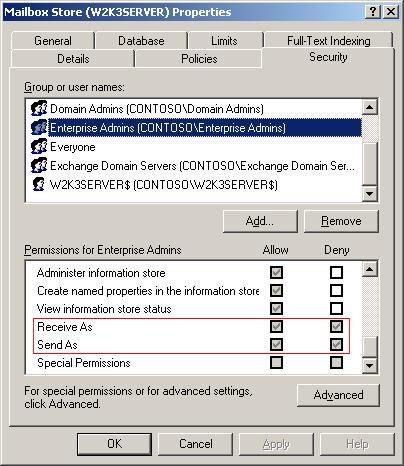
Next, select "Properties" on the context menu of the mailbox store and select the "Security tab".
If you want to grant the access to all mailboxes to a non-administrative account, you can simply add that account to the list and grant the "Send As" and "Receive As" permission.
To grant those permissions to an administrative account, you must perform a few additional steps, since members of the Domain Administrators have a deny on these permission
 The security properties of the mailbox store
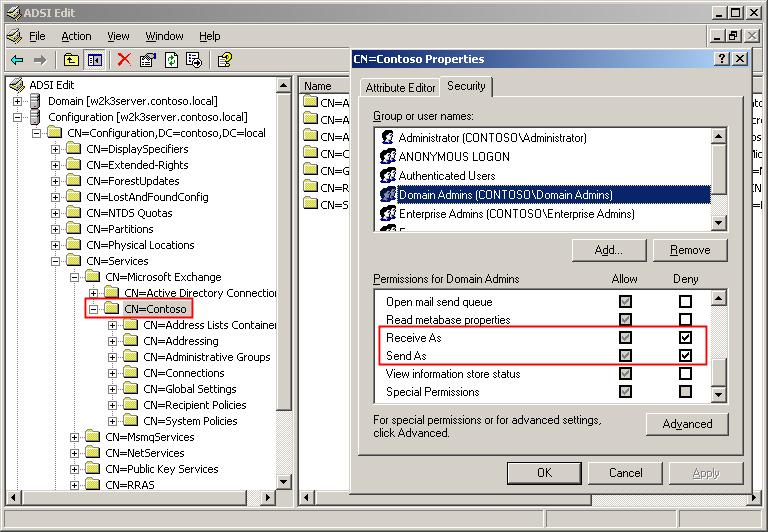
This denial is placed at the organizational level. This can be examined with ADSIEdit (adsiedit.msc):
 ADSI edit displaying the security settings for the Exchange Organization
You can see, that the Domain Administrators have both, an allow as well as a deny permission. This is propagated down to the mailbox store, and prevents administrative accounts from accessing other users mailboxes. Now, you can remove these deny permission, but this is not advisable - they are there for a reason. You would end up with far too many people having these rights.
A better approach is to give only one specific account these rights. If this account is also in the Domain Administrators group and already displayed in the security tab, click "Advanced" and then "Add". Select the account the grant the "Receive As" and "Send as" permissions.
The account will be granted the permissions, because an explicit allow on a lower level overrides an inherited deny.
cdb844eb-7c3b-424f-b01b-cb89eac2a87b|3|4.7
Tags:
permissions, send, receive, as, domain, administrators, mailbox, store
 Technorati:
permissions, send, receive, as, domain, administrators, mailbox, store
Description [Updated]
Updates
- 2008-07-23: Corrected intra-site links.
One question that came up lately in the newsgroups is: How can I find messages containing certain keywords in the mailboxes of all users in my organization?
This scenario is not directly supported by Exchange. All one can do is to search each mailbox individually.
You must follow these steps to do the search over all mailboxes:
- Enumerate the users which have a mailbox. Essentially, these are the users appearing on the global address list. See How to get the Global Address List programatically for more information on how to do this.
- Build the mailbox url which can be used to access the mailbox via WebDAV or ExOleDB. See Get the WebDAV url for an Exchange 2000/2003 mailbox on how to do this. If you are using the ExOleDB provider or want to use the administrative virtual root instead, see the remarks section for more information.
- Once you have the url for the mailbox you can start accessing it. If you must support different languages, see Getting Well-Known Mailbox Folder URLs on MSDN to get the url of the default folders.
- If you are using WebDAV and have Form-based-authentication enabled on your server, you must do a manual logon to the mailbox. See Access the Exchange store via WebDAV with Form-Based-Authentication turned on.
Remarks
Permissions
Depending on how you want to access the mailboxes, you need different permissions:
- If you are using the normal urls (e.g. http://myserver/exchange/username), you need access permissions to all mailboxes on the MAPI level. See HOWTO: Grant access to all mailboxes on a mailbox store to a special account on how to do this. If you have more than one mailbox store, you should grant the necessary permissions on each mailbox store. To simplify this process, you could also grant the "Send as" and "Receive as" permission on the Administrative Groups container via ADSIEdit.msc instead of each mailbox store.
- You can also use the administrative virtual root. This method is used by the Exchange Systems manager, and it is available via WebDAV and ExOleDB. The normal MAPI permissions are completely ignored when using this method, but an administrative account is required to use this method (See Working with Store Permissions in Microsoft Exchange 2000 and 2003 on Technet for more information on this topic).
Mailbox urls
- If you are using WebDAV to access the store, you can simply build the mailbox url based on the article Get the WebDAV url for an Exchange 2000/2003 mailbox. To use the administrative root instead, modify the url from http://myserver/exchange/mailboxname to http://myserver/exadmin/admin/<dsndomainname>/mbx/<mailboxname>. You must replace the <dnsdomainname> with the primary smtp domain name of your organization.
- If you are using ExOleDB, you must modify the address from http://myserver/exchange/mailboxname to file://./backofficestorage/<dnsdomainname>/mbx/<mailboxname>. To use the administrative virtual root, change this url to file://./backofficestorage/admin/<dnsdomainname>/mbx/<mailboxname>.
a966542f-ad7f-49c4-89a7-b39ed5799c48|2|5.0
Tags:
exchange, adsi, gal, exoledb, webdav, mailbox, permissions
 Technorati:
exchange, adsi, gal, exoledb, webdav, mailbox, permissions